React 组件基础
方法论:组件 = 可复用的积木。理解 Props 和 State,就理解了 React 的 80%。
📖 本节目标
学完本节,你将能够:
- ✅ 理解什么是组件
- ✅ 掌握 Props(传递数据)
- ✅ 掌握 State(管理状态)
- ✅ 学会最常用的 Hooks
预计用时:25 分钟
0. 开始前必看:Vibe Coding 心法(重要!)
0.1 不要被语法吓到!
⚠️ Vibe Coder 的救命稻草!
React 的代码看起来很复杂,但你不需要精通所有语法细节。下面告诉你哪些要懂,哪些交给 AI。
你必须理解的逻辑(核心概念):
| 概念 | 你要懂什么 | 为什么重要 |
|---|---|---|
| 组件 | 什么是组件、为什么要拆组件 | 这是思维方式,AI 写不了 |
| Props | 数据从外部传入组件 | 理解数据流向 |
| State | 组件内部有“记忆“,会变化 | 理解交互原理 |
| 何时用 State | 点击、输入等需要变化的用 State | 判断用不用 State |
AI 可以代劳的语法(细节写法):
| 语法 | 例子 | 不用背! |
|---|---|---|
| Props 类型定义 | { text }: { text: string } | 让 AI 写 ✅ |
| 解构语法 | { title, price, image } | 让 AI 写 ✅ |
| TypeScript 接口 | interface ButtonProps {} | 让 AI 写 ✅ |
| Hooks 具体写法 | const [x, setX] = useState() | 让 AI 写 ✅ |
| useEffect 依赖数组 | useEffect(() => {}, []) | 让 AI 写 ✅ |
0.2 学习策略
┌─────────────────────────────────────────────┐
│  第1步:理解概念(你的任务)                  │
│  "组件是什么?Props 和 State 有什么区别?"    │
│                                             │
│  第2步:描述需求(你的任务)                  │
│  "我要一个计数器,点击按钮数字+1"             │
│                                             │
│  第3步:AI 生成代码(AI 的任务)              │
│  AI 会写出所有语法细节                       │
│                                             │
│  第4步:运行调试(你的任务)                  │
│  看效果,不对就告诉 AI "改成xxx"             │
└─────────────────────────────────────────────┘
Vibe Coding 核心:你负责想明白“要做什么“,AI 负责写“怎么做“。看到
{ text }: { text: string }这种复杂语法?跳过!直接问 AI。
1. 什么是组件?
一句话解释
组件 = 可复用的 UI 积木
把页面拆成一个个小块,每块就是一个组件:
页面
├── Header(头部组件)
├── ProductList(产品列表组件)
│   ├── ProductCard(产品卡片组件)
│   ├── ProductCard
│   └── ProductCard
└── Footer(底部组件)
为什么要用组件?
| 问题 | 组件化解决方案 |
|---|---|
| 代码重复 | 写一次,到处用 |
| 难以维护 | 改一处,全局生效 |
| 协作困难 | 分工明确,各写各的 |
2. 创建组件
2.1 最简单的组件
// 一个简单的按钮组件
function MyButton() {
  return (
    <button className="bg-blue-500 text-white px-4 py-2 rounded">
      点击我
    </button>
  )
}

// 使用组件
export default function Page() {
  return (
    <div>
      <MyButton />
      <MyButton />
      <MyButton />
    </div>
  )
}
2.2 组件文件组织
推荐的文件结构:
src/
├── app/
│   └── page.tsx
└── components/          # 👈 组件都放这里
    ├── Button.tsx
    ├── Card.tsx
    ├── Header.tsx
    └── Footer.tsx
创建组件文件 src/components/Button.tsx:
export default function Button() {
  return (
    <button className="bg-blue-500 text-white px-4 py-2 rounded">
      按钮
    </button>
  )
}
在页面使用:
import Button from '@/components/Button'

export default function Page() {
  return (
    <div>
      <Button />
    </div>
  )
}
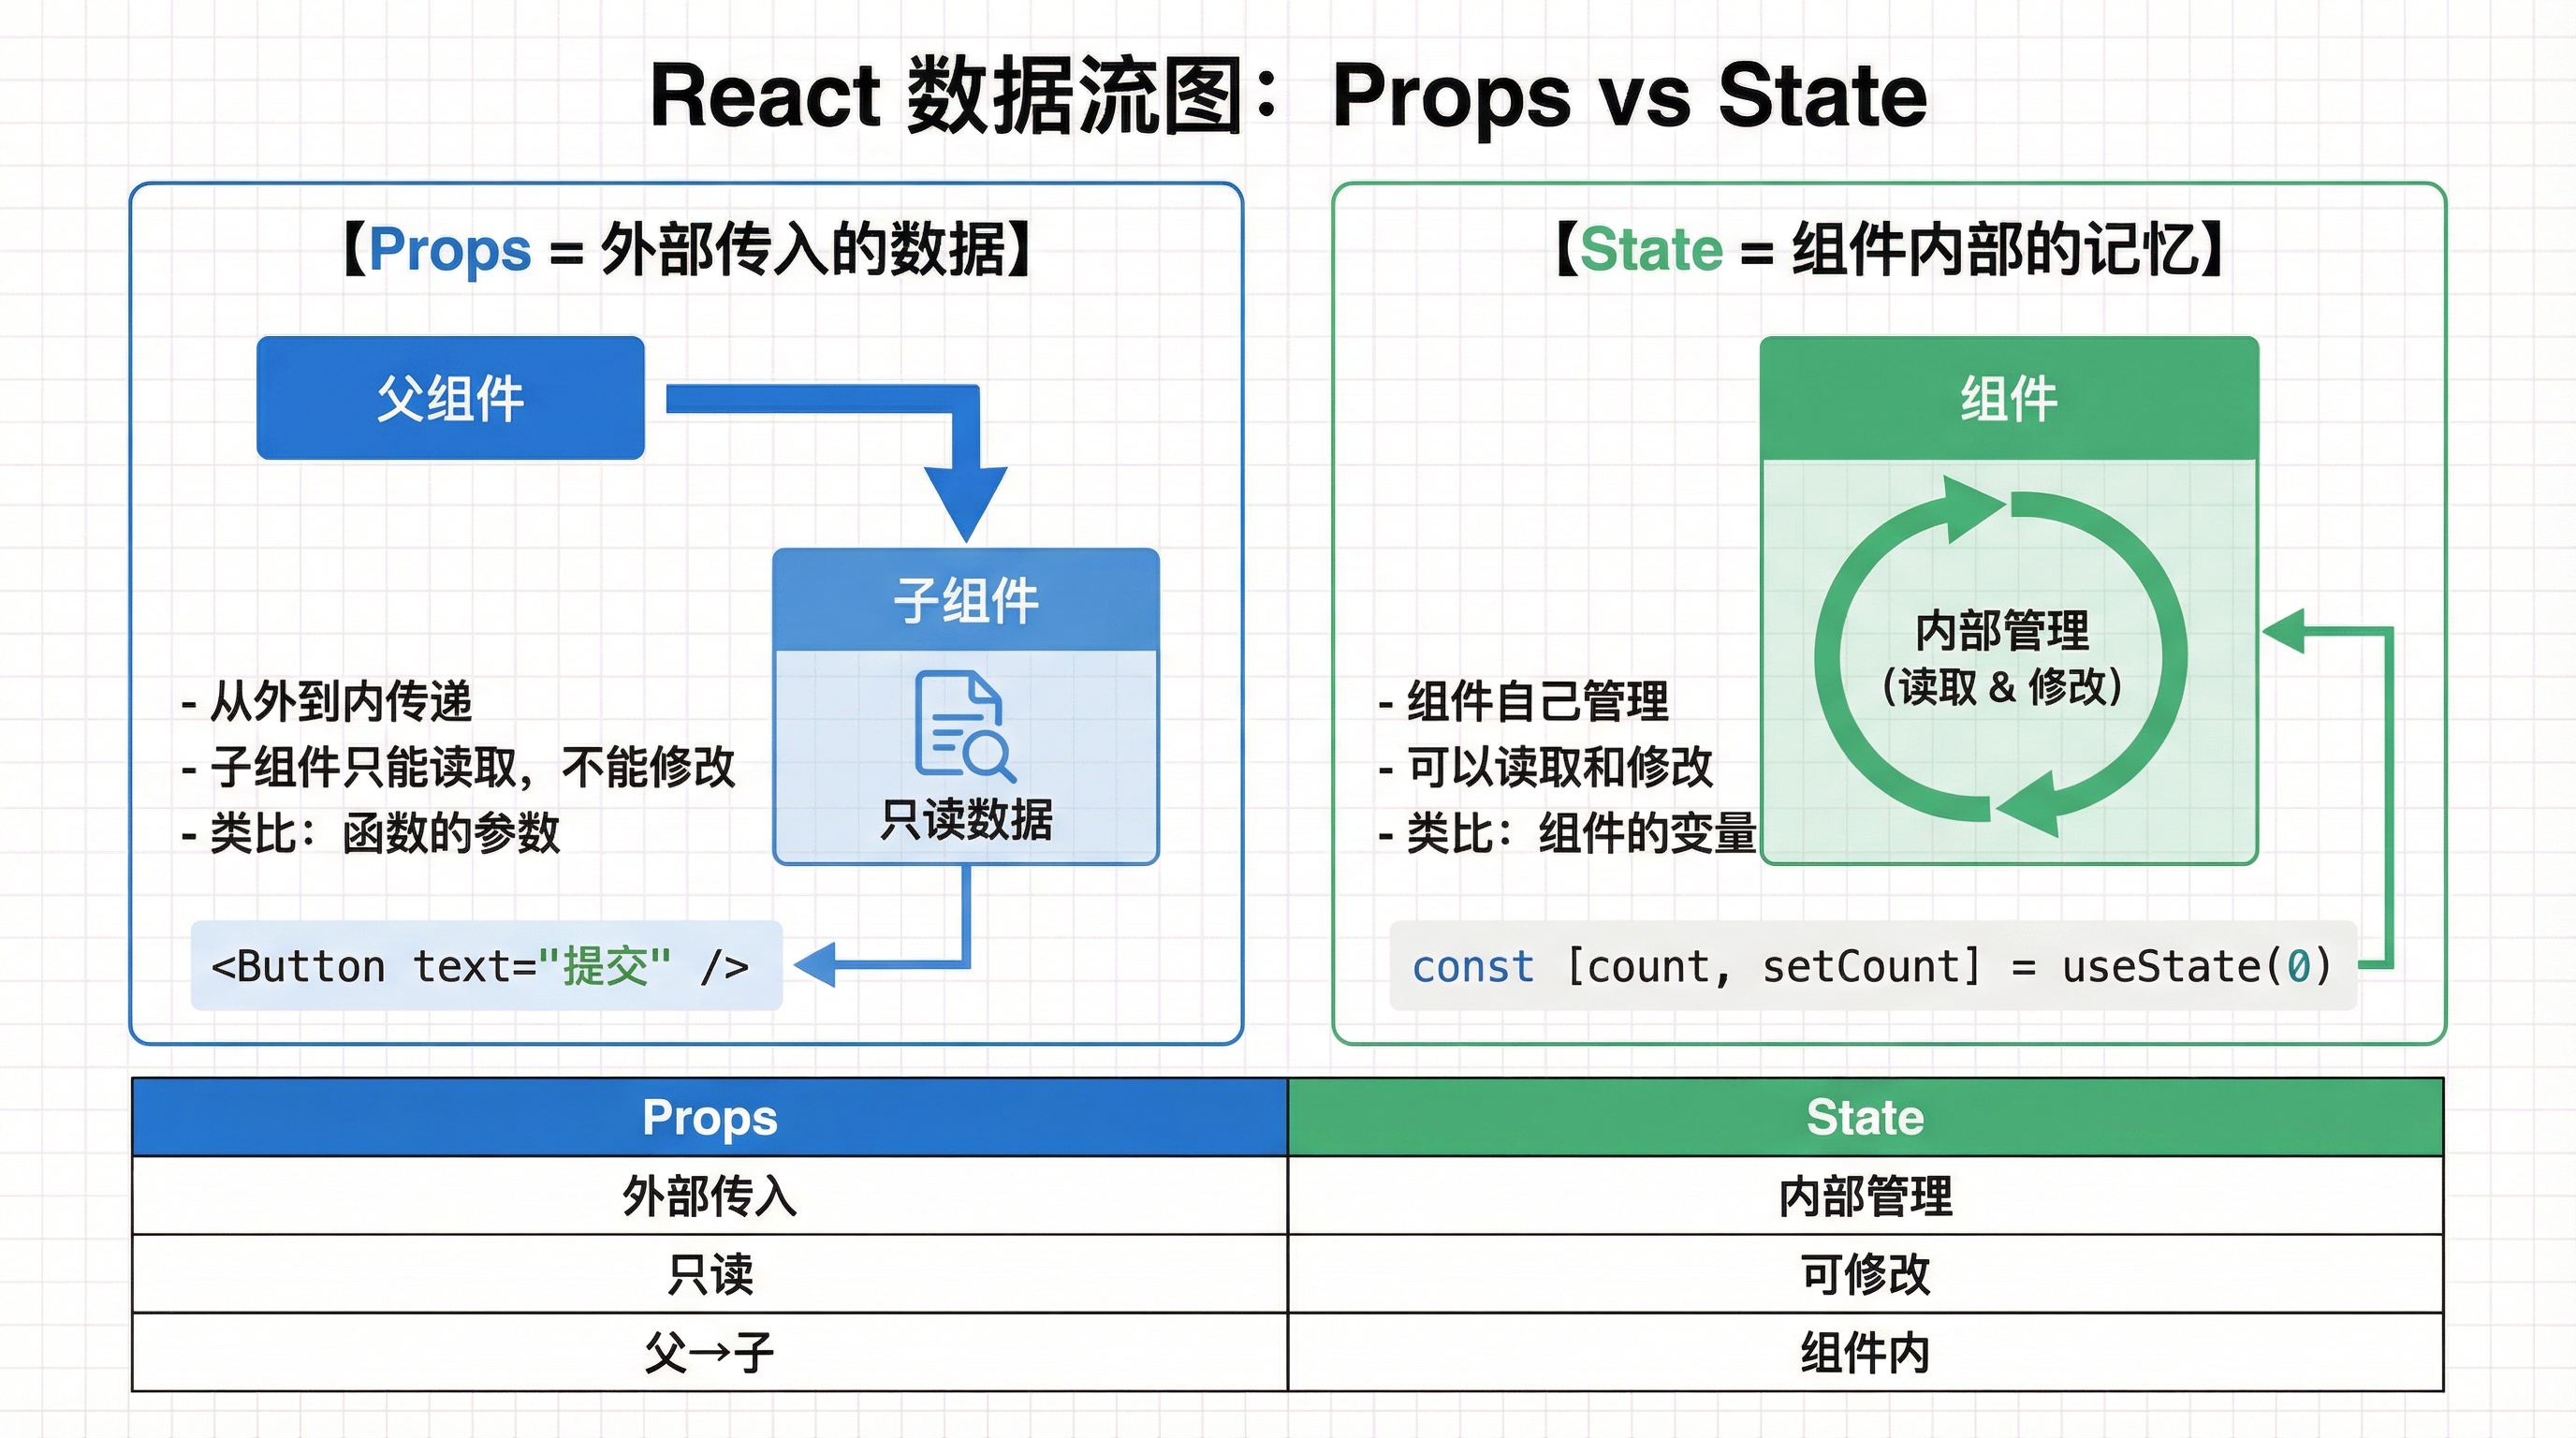
3. Props:传递数据
3.1 什么是 Props?
Props = 组件的参数(从外到内的数据)
类比:Props 就像快递标签📦
你(父组件)→ 快递标签(Props)→ 快递员(子组件)

<Button text="提交" color="blue" />
         ↑         ↑
       Props    Props
核心理解:
- 父组件决定:传什么数据(就像你写快递标签上的收件人、地址)
- 子组件接收:拿到数据后显示(就像快递员按标签送货)
- 子组件不能改:Props 是只读的(快递员不能改标签)
3.2 最简单的例子(看懂这个就够了!)
// 定义组件,接收 props
function Button({ text }: { text: string }) {
  //         ↑ 这里接收外部传入的 text
  return (
    <button className="bg-blue-500 text-white px-4 py-2 rounded">
      {text}  {/* 这里显示 text 的值 */}
    </button>
  )
}

// 使用组件,传递不同的 text
export default function Page() {
  return (
    <div className="flex gap-2">
      <Button text="提交" />  {/* 传入 "提交" */}
      <Button text="取消" />  {/* 传入 "取消" */}
      <Button text="删除" />  {/* 传入 "删除" */}
    </div>
  )
}
Vibe Coding 提示:看到
{ text }: { text: string }觉得头晕?你只需要理解:
text是从外面传进来的数据。至于为什么写两次
text,为什么有冒号和花括号? → 别管!让 AI 写!你只要知道:“我要给这个组件传个 text 数据,然后组件里能用
{text}显示它。”
### 3.3 多个 Props(看懂就行,让 AI 写!)

```tsx
// 定义类型(这部分让 AI 写!)
interface ButtonProps {
  text: string
  color?: 'blue' | 'red' | 'green'  // 可选参数
  onClick?: () => void              // 点击事件
}

function Button({ text, color = 'blue', onClick }: ButtonProps) {
  const colors = {
    blue: 'bg-blue-500 hover:bg-blue-600',
    red: 'bg-red-500 hover:bg-red-600',
    green: 'bg-green-500 hover:bg-green-600',
  }

  return (
    <button
      className={`${colors[color]} text-white px-4 py-2 rounded`}
      onClick={onClick}
    >
      {text}
    </button>
  )
}

// 使用
<Button text="确认" color="green" onClick={() => alert('点击了')} />
<Button text="删除" color="red" />
<Button text="提交" />  {/* 默认蓝色 */}
Vibe Coding 提示:
interface ButtonProps { ... }这种类型定义?→ AI 写!color?: 'blue' | 'red'这种可选参数语法?→ AI 写!- 你只需要懂:“
color参数可以传 blue/red/green,不传就默认 blue”
3.4 实战:产品卡片组件
// src/components/ProductCard.tsx
interface ProductCardProps {
  title: string
  price: number
  image: string
  onBuy: () => void
}

export default function ProductCard({
  title,
  price,
  image,
  onBuy
}: ProductCardProps) {
  return (
    <div className="bg-white rounded-lg shadow p-4">
      <img src={image} alt={title} className="w-full h-48 object-cover rounded" />
      <h3 className="text-lg font-bold mt-2">{title}</h3>
      <p className="text-red-500 text-xl">¥{price}</p>
      <button
        onClick={onBuy}
        className="mt-2 w-full bg-blue-500 text-white py-2 rounded"
      >
        立即购买
      </button>
    </div>
  )
}

// 使用
import ProductCard from '@/components/ProductCard'

export default function Page() {
  const products = [
    { id: 1, title: 'iPhone 15', price: 5999, image: '/iphone.jpg' },
    { id: 2, title: 'MacBook Pro', price: 12999, image: '/macbook.jpg' },
  ]

  return (
    <div className="grid grid-cols-2 gap-4 p-4">
      {products.map(product => (
        <ProductCard
          key={product.id}
          title={product.title}
          price={product.price}
          image={product.image}
          onBuy={() => alert(`购买 ${product.title}`)}
        />
      ))}
    </div>
  )
}
4. State:管理状态
4.1 什么是 State?
State = 组件的“记忆“(会变化的数据)
类比:State 就像电子计分板🏀
想象一个篮球比赛的电子计分板:

┌─────────────────────┐
│   主队 vs 客队       │
│    23  :  18        │  ← 这是 State(比分会变)
│   [+1] [+2] [+3]    │  ← 按钮改变比分
└─────────────────────┘

特点:
1. 比分会变(State 会变)
2. 按钮点击后,比分自动更新显示(State 变化,页面自动刷新)
3. 每个计分板独立计数(每个组件有自己的 State)
Props vs State 的区别:
| Props | State | |
|---|---|---|
| 来源 | 外部传入 | 内部创建 |
| 能改吗 | ❌ 不能改(只读) | ✅ 能改(可变) |
| 类比 | 快递标签(收到就是收到) | 电子计分板(可以加分) |
| 用途 | 父组件给子组件传数据 | 组件记住自己的状态 |
4.2 最简单的例子:计数器
'use client'  // 👈 使用 State 必须加这行(为什么?别管,记住就行)

import { useState } from 'react'

export default function Counter() {
  const [count, setCount] = useState(0)  // 初始值为 0
  //     ↑      ↑         ↑
  //   当前值  改值的函数  初始值

  return (
    <div className="p-4">
      <p className="text-2xl">计数:{count}</p>
      <button
        onClick={() => setCount(count + 1)}
        className="bg-blue-500 text-white px-4 py-2 rounded mt-2"
      >
        +1
      </button>
    </div>
  )
}
4.3 State 的“魔法“解释(必看!)
学生最常问的问题:
Q1: 为什么用方括号
[count, setCount]?A: 这是 JavaScript 的“解构赋值“语法(让 AI 写就行)。
你只需要记住:
useState会给你两样东西:
- 第一个:当前的值(
count)- 第二个:改值的函数(
setCount)就像电子计分板给你:当前比分 + 加分按钮
Q2: 为什么不能直接
count = count + 1?A: 这是 React 的规则!
错误写法:
count = count + 1 // ❌ React 不知道值变了,页面不会更新正确写法:
setCount(count + 1) // ✅ React 知道了,会自动刷新页面通俗理解:
- 直接改
count= 偷偷改计分板的数字,观众看不到变化- 用
setCount= 正式按下按钮,计分板会闪烁更新,所有人都看到了Vibe Coding 提示:别纠结为什么!记住:改 State 必须用
setXxx函数。
4.4 useState 语法(AI 帮你写!)
const [状态值, 设置函数] = useState(初始值)

// 例子(这些语法细节让 AI 写!)
const [count, setCount] = useState(0)           // 数字
const [name, setName] = useState('')            // 字符串
const [isOpen, setIsOpen] = useState(false)     // 布尔值
const [items, setItems] = useState([])          // 数组
const [user, setUser] = useState(null)          // 对象
你只需要懂:
- 第一个参数是当前值,第二个是改值的函数
- 改值必须用
setXxx函数,不能直接赋值- 具体的 TypeScript 类型标注? → AI 写!
4.5 常见场景
场景 1:输入框
'use client'
import { useState } from 'react'

export default function SearchBox() {
  const [keyword, setKeyword] = useState('')

  return (
    <div>
      <input
        type="text"
        value={keyword}
        onChange={(e) => setKeyword(e.target.value)}
        className="border rounded px-3 py-2"
        placeholder="搜索..."
      />
      <p>你输入的是:{keyword}</p>
    </div>
  )
}
你只需要懂:输入框的值存在
keyword里,输入时用setKeyword更新。
onChange={(e) => setKeyword(e.target.value)}这种写法? → AI 写!
场景 2:显示/隐藏
'use client'
import { useState } from 'react'

export default function Modal() {
  const [isOpen, setIsOpen] = useState(false)

  return (
    <div>
      <button onClick={() => setIsOpen(true)}>
        打开弹窗
      </button>

      {isOpen && (
        <div className="fixed inset-0 bg-black/50 flex items-center justify-center">
          <div className="bg-white p-6 rounded-lg">
            <h2>弹窗内容</h2>
            <button onClick={() => setIsOpen(false)}>
              关闭
            </button>
          </div>
        </div>
      )}
    </div>
  )
}
你只需要懂:
isOpen控制显示/隐藏,true显示,false隐藏。
场景 3:列表操作
'use client'
import { useState } from 'react'

export default function TodoList() {
  const [todos, setTodos] = useState<string[]>([])
  const [input, setInput] = useState('')

  const addTodo = () => {
    if (input.trim()) {
      setTodos([...todos, input])  // 添加到列表
      setInput('')                   // 清空输入
    }
  }

  return (
    <div className="p-4">
      <div className="flex gap-2">
        <input
          value={input}
          onChange={(e) => setInput(e.target.value)}
          className="border rounded px-3 py-2 flex-1"
        />
        <button onClick={addTodo} className="bg-blue-500 text-white px-4 rounded">
          添加
        </button>
      </div>
      <ul className="mt-4">
        {todos.map((todo, index) => (
          <li key={index} className="py-2 border-b">{todo}</li>
        ))}
      </ul>
    </div>
  )
}
你只需要懂:
todos数组存储列表数据- 点击“添加“时,把
input的值加到todos里[...todos, input]这种展开语法? → AI 写!<string[]>这种类型标注? → AI 写!
5. 常用 Hooks
5.1 Hooks 是什么?(必看!)
Hooks = 给组件装备的“工具包“🎒
类比:想象你是一个探险家👨🚀
普通组件 = 空手探险(只能走路)

加上 Hooks = 装备齐全的探险家:
├── useState    = 记忆背包(记住状态)
├── useEffect   = 自动触发器(到达某地自动执行任务)
├── useRef      = 定位器(记住位置)
└── useContext  = 对讲机(跨组件通信)
你只需要记住:
- Hooks 是函数,名字都以
use开头 - Hooks 给组件增加能力(记忆、副作用、引用等)
- 常用的就两个:
useState(记忆)+useEffect(副作用)
Vibe Coding 提示:Hooks 的具体写法和规则?交给 AI! 你只要知道“我需要在组件加载时获取数据“,AI 会用
useEffect帮你写。
5.2 useEffect:副作用处理
useEffect = 自动触发器⏰
类比:想象你设置了一个闹钟
┌──────────────────────────────────┐
│  闹钟设置                          │
│                                  │
│  [X] 每天早上 7 点响              │  ← useEffect(() => {}, [])
│  [ ] 每次温度变化时响              │  ← useEffect(() => {}, [temp])
│  [ ] 一直响(不推荐😱)             │  ← useEffect(() => {})
└──────────────────────────────────┘
基本语法:
'use client'
import { useState, useEffect } from 'react'

export default function UserProfile() {
  const [user, setUser] = useState(null)
  const [loading, setLoading] = useState(true)

  useEffect(() => {
    // 👈 这里的代码会在组件加载时执行
    fetch('/api/user')
      .then(res => res.json())
      .then(data => {
        setUser(data)
        setLoading(false)
      })
  }, [])  // 👈 空数组 = 只在首次加载时执行(闹钟只响一次)

  if (loading) return <div>加载中...</div>

  return <div>欢迎,{user?.name}</div>
}
5.3 useEffect 依赖数组详解(重要!)
学生最常问的问题:
Q: 为什么
[]空数组意味着“只执行一次“?A: 这是 React 的规则!用闹钟理解:
useEffect(() => {
  console.log('执行了!')
}, [])  // 空数组

等价于:
"设置闹钟,不监听任何变化,所以只在首次加载时响一次"
三种常见模式:
| 写法 | 触发时机 | 闹钟类比 |
|---|---|---|
useEffect(() => {}, []) | 只在组件首次加载时 | 闹钟只响一次 |
useEffect(() => {}, [userId]) | 首次加载 + 每次 userId 变化时 | 闹钟监听 userId,它变就响 |
useEffect(() => {}) | 首次加载 + 每次组件更新时 | 闹钟一直响(危险⚠️) |
示例对比:
// 例子 1:只在首次加载时获取数据
useEffect(() => {
  console.log('组件加载了,获取数据')
  fetchData()
}, [])  // 👈 空数组 = 只执行一次

// 例子 2:userId 变化时重新获取
useEffect(() => {
  console.log('userId 变了:', userId)
  fetchUserData(userId)
}, [userId])  // 👈 监听 userId 变化

// 例子 3:每次渲染都执行(通常不需要)
useEffect(() => {
  console.log('组件更新了')
})  // 👈 没有数组 = 一直执行
Vibe Coding 提示:
- 想在组件加载时做事?→
useEffect(() => { ... }, [])- 想在某个值变化时做事?→
useEffect(() => { ... }, [那个值])- 具体的依赖数组规则? → 别管!让 AI 帮你写!
- 闹钟响了要关掉(清理函数)? → AI 会加
return () => { ... },你不用管!
5.4 常见 useEffect 模式(让 AI 写!)
// 1. 只在首次加载时执行
useEffect(() => {
  console.log('组件加载了')
}, [])

// 2. 依赖变化时执行
useEffect(() => {
  console.log('userId 变化了:', userId)
}, [userId])

// 3. 清理函数(组件卸载时执行)
useEffect(() => {
  const timer = setInterval(() => {
    console.log('定时器运行中')
  }, 1000)

  return () => clearInterval(timer)  // 👈 清理定时器(AI 会帮你写)
}, [])
6. 客户端 vs 服务端组件
Next.js 的两种组件
| 类型 | 特点 | 使用场景 |
|---|---|---|
| 服务端组件(默认) | 在服务器渲染,更快 | 静态内容、数据获取 |
| 客户端组件 | 在浏览器渲染 | 交互、useState、事件 |
什么时候用 ‘use client’?
需要加 'use client' 的情况:
- 使用
useState、useEffect等 Hooks - 使用
onClick、onChange等事件 - 使用浏览器 API(如
window、localStorage)
'use client'  // 👈 只有需要交互时才加

import { useState } from 'react'

export default function Counter() {
  const [count, setCount] = useState(0)
  return <button onClick={() => setCount(count + 1)}>{count}</button>
}
7. Vibe Coding 技巧
让 AI 生成组件
好的 Prompt:
帮我创建一个 React 组件:
- 名称:ProductCard
- Props:title, price, image, onAddToCart
- 使用 Tailwind CSS
- 包含:图片、标题、价格、添加购物车按钮
- 点击按钮调用 onAddToCart
常见问题怎么问
# Props 问题
"怎么给组件传递点击事件?"
"怎么设置默认值?"

# State 问题
"怎么在点击后更新页面内容?"
"怎么实现显示/隐藏功能?"

# 渲染问题
"为什么我的列表不显示?"
"怎么遍历数组显示多个组件?"
📝 小结
| 概念 | 说明 | 例子 |
|---|---|---|
| 组件 | 可复用的 UI 积木 | <Button /> |
| Props | 外部传入的数据 | <Button text="提交" /> |
| State | 内部管理的状态 | useState(0) |
| useEffect | 副作用处理 | 加载数据 |
核心理解:
- 组件让代码可复用、可维护
- Props 是“从外到内“传数据
- State 是“组件内部“的记忆
- 需要交互的组件加
'use client'
📚 本章完成
恭喜你完成了前端开发基础的学习!
回顾:
- 前端概述 - HTML/CSS/JS 三件套
- Next.js 入门 - 项目创建与路由
- Tailwind 入门 - 快速写样式
- React 组件 - 组件化开发
下一步: 👉 后端开发基础
学习如何用 FastAPI 创建后端 API。